树莓派pico使用MicroPython与串口屏通讯
如何安装树莓派pico开发工具和配置请参考 树莓派Pico开发软件安装(Thonny)及烧录(flash)
树莓派pico使用MicroPython与串口屏通讯工程下载

串口屏怎么下载程序
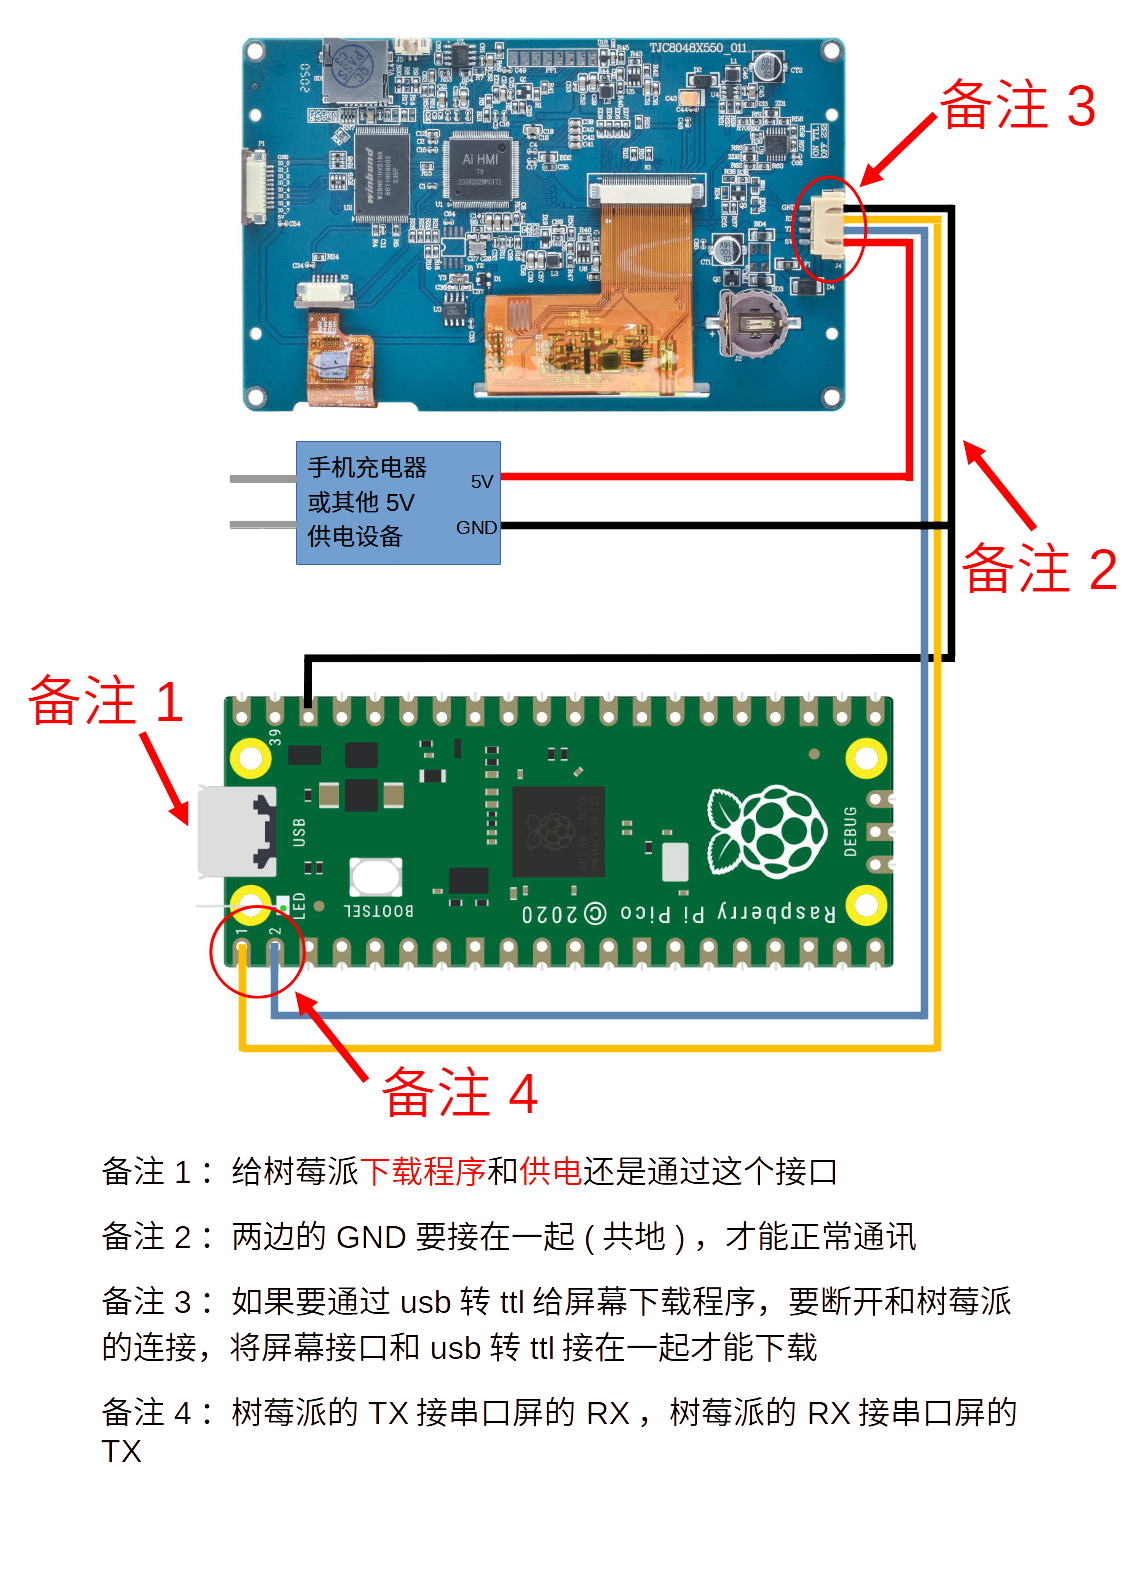
树莓派pico使用MicroPython与串口屏通讯的连接方式
树莓派pico使用MicroPython与串口屏通讯代码
注意
以下代码仅为演示代码,用于测试显示屏能实现最基本的通信功能,如果您需要在正式产品中进行使用,请根据自己的需求对代码进行相应的优化和修改,或以自己的方式实现相应的功能
# 树莓派pico的GND接串口屏或串口工具的GND,共地
# 树莓派pico的GP0接串口屏或串口工具的RX
# 树莓派pico的GP1接串口屏或串口工具的TX
# 树莓派pico的5V接串口屏的5V,如果是串口工具,不用接5V也可以
import machine
import time

# 一帧的长度
FRAME_LENGTH=7

a=0
nowtime=0

# 这里设置串口 0 的波特率为 115200
uart = machine.UART(0, baudrate=115200)

# 使用 25 号引脚作为 LED 连接引脚
led_pin = machine.Pin(25, machine.Pin.OUT)


# 发送结束符
def sendEnd():
    # 要发送的十六进制数据
    hex_data = [0xff, 0xff, 0xff]

    # 将十六进制数据转换为字节数组并发送
    uart.write(bytearray(hex_data))


# 定义定时器回调函数
def tm0(timer):
    global a
    str = "n0.val={}".format(a)
    uart.write(str)
    sendEnd()

    str = "t0.txt=\"现在是{}\"".format(a)
    uart.write(str)
    sendEnd()


    str = "click b0,1"
    uart.write(str)
    sendEnd()

    time.sleep(0.05)

    str = "click b0,0"
    uart.write(str)
    sendEnd()
    a+=1


# 创建一个定时器
timer = machine.Timer()


# 初始化定时器,每 1 秒钟触发一次回调函数
timer.init(period=1000, mode=machine.Timer.PERIODIC, callback=tm0)

# ubuffer用于存放串口数据
ubuffer = []

while True:

    # 如果串口有数据,全部存放入ubuffer
    while uart.any():
        data = uart.read()
        if data:
            ubuffer.extend(data)

    # 当ubuffer的长度大于等于一帧的长度时
    if len(ubuffer) >= FRAME_LENGTH:
        # 判断帧头帧尾
        if ubuffer[0] == 0x55 and ubuffer[4] == 0xff and ubuffer[5] == 0xff and ubuffer[6] == 0xff:
            # 如果下发的是led数据
            if ubuffer[1] == 0x01:
                status = ""
                if ubuffer[3] == 0x01:
                    status = "on"
                    if ubuffer[2] == 0x00:
                        led_pin.value(1)
                else:
                    status = "off"
                    if ubuffer[2] == 0x00:
                        led_pin.value(0)
                str = "msg.txt=\"led {} is {}\"".format(ubuffer[2], status)
                uart.write(str)
                sendEnd()
            # 如果下发的是进度条h0的数据
            elif ubuffer[1] == 0x02:
                str = "msg.txt=\"h0.val is {}\"".format(ubuffer[2])
                uart.write(str)
                sendEnd()
            # 如果下发的是进度条h1的数据
            elif ubuffer[1] == 0x03:
                str = "msg.txt=\"h1.val is {}\"".format(ubuffer[2])
                uart.write(str)
                sendEnd()
            # 删除1帧数据
            del ubuffer[:FRAME_LENGTH]


        else:
            # 删除最前面的1个数据
            del ubuffer[0]
其他参考链接